Want a super easy project to turn something totally drab into absolutely FAB-U-LOUS? Well here goes!
Everyone has a corkboard bulletin hanging around their house, apartment, office, etc. It may not be up on the wall, but look hard, I bet you'll find one in the back of a closet, in a storage room, under a desk - somewhere! If not, the super plain ones are fairly cheap at the Wally World. In the process of moving all of the stuff from an old storage room into the new house, I came across a small corkboard (about 18"x 22" I believe). I have a larger one but something about the size intimidated me from getting this project out of my head and into reality. So anyways, I saw this & just had to stop the other projects i was working on and get this pretty made & hanging on the wall!
What you need:
A corkboard (obviously)
Fabric - I used a medium weight cotton duck, but I'm pretty sure any light/medium weight will work. The amount depends on the size of your corkboard.
Spray adhesive ( I used Elmer's)
Staple gun & staples
Thumbtacks (I used the cheap silver flat thumbtacks that come 200 per pack from Walmart)
Fabric scissors
Lay out your fabric on a flat surface and smooth it out.
Place your corkboard on top of the fabric. Cut the fabric around the corkboard leaving about 2-3 inches of fabric on all sides. (So, if you have an 18"x22" board cut the piece of fabric out about 24"x28")
If you want any decorative applique or embroidery add it now. I just eyeballed where I wanted the monogram, marked my center, and used my embroidery machine to complete the applique. This one was a super cute alphabet from hangtodryapplique.com that is a super quick stitch out. I chose a pretty shade of blue for the fabric and stitched it with a lime green. It's going to look so wonderful hanging on the wall of my newly painted craft room - as soon as we get it painted! If you don't want any extra decoration or personalization, continue to the next step.
Spray the front of the board with adhesive. Carefully place the fabric on top making sure you line up the design of the fabric and the added embellishments so they are where you want them. Now here comes the fun part!
Wrap the fabric around the board, frame and all, and start stapling. You'll want to make sure the fabric is pulled tight (but not crazy tight) around the frame. I like to staple flat on the back of the board that you don't have to have an extra border or ribbon added around the frame. That's a personal preference though.
Flip over the board and see how pretty it already is? This final step is the one that took me the longest but it's really not hard at all. Take the thumbtacks and push them in up as close to the inside edge of the frame as possible so that they'll lay flat. Continue these in a pattern you like around the edge - I put them almost touching right next to each other, but i'm sure it would look just as cute with about half of the tacks I used.
See, that didn't take too long did it? I think mine took about an hour and I wasn't really sure of my plan of attack when I started so it may take you even less time!
Now look at your super cute corkboard! Add the hanging hardware to the back and hang your pretty up on the wall! Everyone will admire your work as they walk by - I promise!
Of course, if you still don't want to make one yourself & would like me to make one for you, - shoot me an email! I'll be happy to set up a customized listing for you in my Etsy shop.
Showing posts with label applique. Show all posts
Wednesday, April 3, 2013
Sunday, August 26, 2012
It's Time to Go Back to School!
Well, the summer passed by entirely too quickly and all the little people are returning to school. So, course some of my favorite little people needed some items to take with them back to school!
I used the Big Applique font from 8 Claws and Paw to create a design for Emily's "School Rocks" shirt. I had to decrease the size of the letters a good bit so they'd all fit in one hooping, but it worked wonderfully! Sweet girl wore it to daycare the last day of summer to get everyone excited about going back to school :)
Next up on the goodie list, Ayden needed his own little backpack for daycare. I got a little camo Cinch Sak from the 31 party I had earlier this summer. I thought it'd be ideal since it's very lightweight and not as bulky as a lot of the bags are these days. It took me awhile to figure out what I wanted to put on it - I didn't want to only put his name on it. I mean he is only 2 - he needs something cutesy right? I finally decided on the Squirrel Alphabet from Planet Applique. I used fleece for the squirrl to give it a little texture. After I'd done the applique, I wanted to add his name somewhere but just didn't want to do the traditional above or below the applique. I decided to make it a little more fun and put it in the squirrel's tail using a font from my machine. It was the perfect subtle touch that just "made" the bag!
The last of my back to school goodies was for a new friend that was in deperate need for a first day of kindergarten outfit. Apparently she'd ordered one over a month prior online, but a week before school started, they contacted her saying they were unable to complete her request. That just makes me sad that someone would do that to someone! Luckily, I was able to fit her in. I was able to find the same design her sweet Grace picked out online & made her this rockin' dress! Kindergarten Rocks design came from Embroidery Boutique. I used the Itch 2 Stitch's Jelly Bean font to add her name. This was so much fun! Monday, August 20, 2012
Welcome to Izzy's Beach Bash!
I am so excited that I can finally share pictures of all the goodies I've been making over the past 4 months! I was soooooo happy when I was asked/allowed to help with planning a baby shower for a dear friend. I knew I'd be doing the cake, but I was even happier to be able to contribute to the decorations.
So, with Annette and I both on decorations, it was sure to be a whole lot of fun. Before we even knew the colors or theme of the nursery, we knew we wanted to use girly blue & red together. When we found out the theme and colors of the nursery, we were thrilled that we could incorporate the nursery theme into the theme of the shower!
I know I went a tad bit overboard, but hey, it was an opportunity to learn how to applique onesies & make tutus, sew a straight line with the runners and tablecloths, and try to perfect a new way of doing banners. Plus, Leslie goes overboard with everything she does so she deserved an over the top shower right?
Annette went just as overboard as I did! She painted chairs & signs & all sorts of silver pieces with chalkboard paint. She made hanging decorations with paper plates that were soooooooo cute! She has an awesome collection of pewter serving pieces that added the perfect elegant touch to the super cute shower!
Thanks for looking!
Sunday, June 10, 2012
Rainy Weekend Fun!
It was a miserable weekend for doing outside activities with all the rain and dreary weather, so I got to play in the craft room! Yippee!
I was pretty productive for not working at an insanely crazy pace. I embroidered some little outfits for sweet Ensley, made a pair of patriotic shirts for a friend at work, and finished my June challenge entry. I'm working on some charms for another long term project too. I'm on such a roll, I really wish I didn't have to go to work this week!
![]() |
| I used 2 mini filled designs from Applique Momma to embellish the top of this little romper. |
![]() |
| This girly octopus from Applique Momma girlied up this blue bubble. |
![]() |
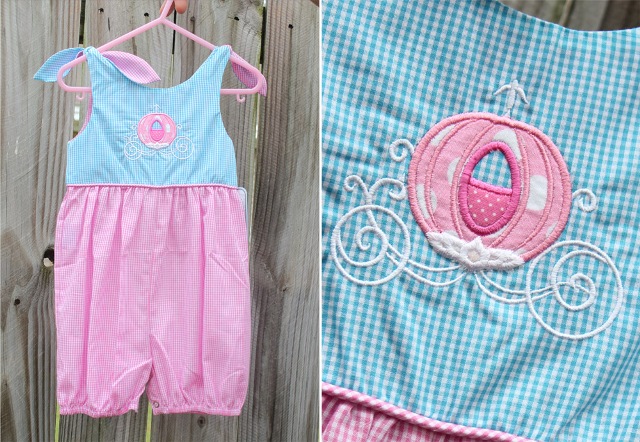
| The princess coach came from Frou Frou by Heather Sue. I love this one & use it often! |
![]() |
| What better way to brighten up a dreary day than to do a fun summer sunshiny beach bag! This design came from Luna Stitches. |
![]() |
| I used the Old Glory Alphabet & Preppy Monogram Font from Hang to Dry Applique for this Grandpa - Grandson set! |
Monday, May 28, 2012
Some of my Favorite Appliques
I was just looking through my little blog here and realized I haven't posted many of the appliques I've done! This is crazy since it's my new obsession, so I'm going to try to fix that now.
![]() |
| My very first appliques! Alphabet from Planet Applique! |
![]() |
| Are you ready for the Fourth of July? Fireworks by Applique Junkie! |
![]() |
| Ayden's 2nd birthday outfit! Pirate Ship from Planet Applique! |
![]() |
| Austin's Sock Monkey! Valentine Sock Monkey from the Itch 2 Stitch |
![]() |
| Cute Burp Cloths Both Designs by Planet Applique |
![]() |
| "I Dig You" by Planet Applique |
![]() |
| Friendly Shark by Lynnie Pinnie *bought 2 pairs of Walmart shorts and used the fabric from one to do the applique! |
![]() |
| Ayden's Spring Ensemble - LOL Caution Sign by Hang to Dry Applique Dinosaur Alpha & Sports Easter Eggs by Planet Applique |
![]() |
| Emily's Birthday Banner Cupcakes by Big Dreams Embroidery I modified the candy piece from Embroidery Boutique |
![]() |
| Emily's Octopus! How cute is this? Applique Junkie |
Sunday, April 8, 2012
My New Mail Organizer!
Tonight, I completed another Pinterest project & I think this might possibly be my favorite yet! I used the tutorial found here: http://www.noodle-head.com/2010/05/mail-organizer-tutorial.html. I just tweaked it so I could use my embroidery machine, of couse, since it's my current obsession! I bought the fabric from Hobby Lobby, used the Aquarelle font from Meringue Designs, and the Classy frame from Hang to Dry. I absolutely love this! Can't wait until my hubby wakes up tomorrow to hang it on the wall for us!
Woohoo! It's up on the wall now :)
Thursday, April 5, 2012
Patchwork Bunny Pouch
Last month I participated in the first monthly challenge on Applique Forum. I really enjoy being a member of this forum - I've learned so much from all the ladies & it's a super fun & friendly atmosphere! I thought the challenge would help me learn even more. Even though all participants used the same design, there were separate categories for hobbyists, professionals, & mentor/administrators of the forum. I entered as a hobbyist & our task was to make something out of the box & to focus on mixing fabric patterns.
When I started thinking about what I was going to do with this challenge, I knew I wanted something patchwork. I’m not sure why, but I’m obsessed with patchwork designs right now & at the beginning of the challenge, I hadn’t had any successful attempts. I had it in mind that I would make an apron. It didn’t take me too long to find the fabric I wanted to use. I searched online and then by luck, the little quilt store near my real job had a charm pack in stock. I used Ooh La La by Bunny Hill Designs for Moda. I didn’t realize it was a “baby” design, I’m not sure why the pink & blue didn’t clue me in – LOL.
After I got the fabric, I was so eager to start on the project but of course life got in the way – sigh. On my way home from delivering cakes the day I’d scheduled to work on the challenge, I was exploring thru Pinterest (my hubby was driving) and found the cutest tutorial for a patchwork bag.
http://pinterest.com/pin/220746819205363638/ I thought that might be a better option than the apron I was going to attempt without a pattern (especially considering I’ve only sewn a couple of things & they both went horribly wrong).
So that’s what I did. I just followed the instructions for making the patchwork panels for the bag, and then did the appliqué on top. I chose to use the blues for the bag, an ivory with a gray scene for the scallop piece, and then used the different pinks for the rabbit. Oh, I added a piece of lace on top of the ivory/gray scene to give it a little something extra! I was a little unhappy with the puckering of fabric in the bunny, but it kind of reminded me of a quilt from my hubby’s grandmother so I thought it added a little character & I went with it. Once I’d completed the appliqué, I just finished following the instructions on the tutorial. I used ribbon instead of cording – mainly cause it was 1 a.m. and that’s what I had
I had so much fun with this challenge and can’t wait for the next one. I am using and abusing them to learn how to do new things since I’m a newbie to most of this
I was shocked that I received enough votes to get 2nd place in the Hobby category
I know there were only 40-something entries but still! It was finally a contest that wasn't a popularity contest since it remained fairly anonymous the entire time! So much fun! I can't wait to see what they challenge us with next month!
When I started thinking about what I was going to do with this challenge, I knew I wanted something patchwork. I’m not sure why, but I’m obsessed with patchwork designs right now & at the beginning of the challenge, I hadn’t had any successful attempts. I had it in mind that I would make an apron. It didn’t take me too long to find the fabric I wanted to use. I searched online and then by luck, the little quilt store near my real job had a charm pack in stock. I used Ooh La La by Bunny Hill Designs for Moda. I didn’t realize it was a “baby” design, I’m not sure why the pink & blue didn’t clue me in – LOL.
After I got the fabric, I was so eager to start on the project but of course life got in the way – sigh. On my way home from delivering cakes the day I’d scheduled to work on the challenge, I was exploring thru Pinterest (my hubby was driving) and found the cutest tutorial for a patchwork bag.
http://pinterest.com/pin/220746819205363638/ I thought that might be a better option than the apron I was going to attempt without a pattern (especially considering I’ve only sewn a couple of things & they both went horribly wrong).
So that’s what I did. I just followed the instructions for making the patchwork panels for the bag, and then did the appliqué on top. I chose to use the blues for the bag, an ivory with a gray scene for the scallop piece, and then used the different pinks for the rabbit. Oh, I added a piece of lace on top of the ivory/gray scene to give it a little something extra! I was a little unhappy with the puckering of fabric in the bunny, but it kind of reminded me of a quilt from my hubby’s grandmother so I thought it added a little character & I went with it. Once I’d completed the appliqué, I just finished following the instructions on the tutorial. I used ribbon instead of cording – mainly cause it was 1 a.m. and that’s what I had
I had so much fun with this challenge and can’t wait for the next one. I am using and abusing them to learn how to do new things since I’m a newbie to most of this
Thursday, March 1, 2012
My First Embroidered Onesie
Ever wonder why all those ridiculously cute embroidered/appliqued onesies cost so much? Well let me tell you - they are a pain in the tookus! What makes them so adorable makes them scary hard on a single needle embroidery machine! They are so small so the embroidery field is also very small. The hard part is keeping the bottom, top, and excess sides out of the way of the needle.
I made an appliqued onesie for a friend one time before and used a cheap pack of Gerber onesies from Walmart I believe. Even though it was a slightly larger size, it was still hard because the material was quite thin and easily tore. It made for a cute gift, but it was definitely not the best quality.
When another friend asked me to make an itsy bitsy teenie weenie 3-6 month size onesie, I was quite scared that i'd spend a fortune messing try and try up. I found the perfect design at http://www.8pawsandaclaw.com/. I have learned a good bit since my previous attempt and heard a tip where clothespins are supposed to help. What the heck right? I tried them and I wouldn't say it was a perfect solution, but it did help tremendously! I was able to embroider the design on the shirt & if I hadn't had a thread issue at the very end, the entire process would have been MUCH more pleasant than I was anticipating. It was still nerve racking & a project you have to babysit on the machine, but well worth the time and effort in the end :)
I made an appliqued onesie for a friend one time before and used a cheap pack of Gerber onesies from Walmart I believe. Even though it was a slightly larger size, it was still hard because the material was quite thin and easily tore. It made for a cute gift, but it was definitely not the best quality.
When another friend asked me to make an itsy bitsy teenie weenie 3-6 month size onesie, I was quite scared that i'd spend a fortune messing try and try up. I found the perfect design at http://www.8pawsandaclaw.com/. I have learned a good bit since my previous attempt and heard a tip where clothespins are supposed to help. What the heck right? I tried them and I wouldn't say it was a perfect solution, but it did help tremendously! I was able to embroider the design on the shirt & if I hadn't had a thread issue at the very end, the entire process would have been MUCH more pleasant than I was anticipating. It was still nerve racking & a project you have to babysit on the machine, but well worth the time and effort in the end :)
Wednesday, February 29, 2012
French Bulletin Board Tutorial
I’ve loved these boards for years! I don’t know why I never thought of making one before. I mean, they don’t require an embroidery machine much less a sewing machine, but it wasn’t until I got my embroidery machine that I buckled down and decided to make one. I did very little research to determine how to make them, so please feel free to adapt these instructions in anyway you think might work better for your project – this is just what works best for me!
Materials:
- 1 canvas (I used a 16x20 that came in a bulk package of 5 from Michael’s)
- 1 piece of desired fabric at least 2 inches bigger in both directions of your canvas – so if you use a 16x20, you need at least an 18x22 piece of fabric (I usually use a fat quarter J)
- Fabric & embroidery thread for the appliqué/monogram if desired
- 1 piece of light-medium weight quilting batting the same size as your fabric
- Spray adhesive
- Staple gun with staples
- ¼ inch or narrower ribbon in a color that coordinates with your fabric
- Buttons or brads for where the ribbon meets
- Sewing needle & thread if buttons are used
- Ribbon or cording the depth of the canvas to “frame” the canvas (optional)
- Hot glue gun & glue to attach the ribbon “frame”
Step One:
If your fabric isn’t already cut to the size needed, I usually just lay the canvas down on top of the fabric and cut the fabric out with at least an inch extra on each side of the canvas. Once I have my fabric cut, I go ahead and do my appliqué or monogram on my embroidery machine at this point.
Step Two
I use a little spray adhesive to put the batting onto the board. Smooth it out so there aren’t any lumps and bumps. Add a little more spray adhesive and the put the fabric on top. You may not need the adhesive, but it helps me keep the monogram in the center where I want it. If I didn’t have a specific center or patterned design, I wouldn’t worry about it J
Use your staple gun around the outer edges to attach the fabric & batting to the board. Just be careful and don’t shoot yourself in the finger with a staple! OUCH!
Step Three
Once the fabric is attached, it’s time to place your ribbon. Personally, I like to make the ribbon blend in with the fabric. In this case, the fabric had a nice pattern to it that I could follow with my ribbon to make sure it was nice and straight.
You can place the ribbons however you’d like, just remember that if the spaces in between are too small, you won’t be able to fit larger items on the board, but if they are too big, you might lose some of the smaller items. I usually cut strips of ribbon long enough to stretch the entire diagonal length of the board and then place them on the board to see how I like it before I secure anything. Once I have it placed, I sew a button covering where the ribbons meet. I also staple the ribbon on the sides or around the back to make sure they are good and secure.
Step 4
So your board is looking pretty good now right? You could leave it alone here, but I like to give it a little more polished look and add ribbon or cording around the edges. I just use hot glue to attach it but there may be something better out there to use. Feel free to share any tips you have!
Completely optional, slightly anal step: I decided I didn’t like the back of my board (because you know the wall is going to complain if it has to look at an ugly back) so I also hot glued little buttons to cover the knots where I’d sewn the buttons on the front. If you choose to do this, watch out for the hot glue that comes thru the little holes on the buttons J
If you'd rather purchase one customized just for you, visit my Etsy shop and I'll make one for you!
If you use this tutorial, I'd love to see pics of your finished projects! Thanks so much!
Subscribe to:
Posts (Atom)